
The Ultimate Hawaiian Roll Mini Grilled Cheese: Sweet, Savory Perfection
Transform your next gathering or quick lunch with these irresistible Hawaiian Roll Mini Grilled Cheese sandwiches. The signature sweetness of the Hawaiian rolls perfectly complements the salty, melted cheese for a bite-sized snack that disappear almost instantly. This recipe uses simple ingredients to create maximum flavor, making it a guaranteed crowd-pleaser.
Why You Will Love This Recipe
These Hawaiian Roll Mini Grilled Cheese sandwiches are the definition of comfort food elevated. They strike the perfect balance between sweet and savory, thanks to the unique flavor profile of the rolls. They are incredibly easy and quick to prepare, making them ideal for last-minute snacks, game days, or easy weeknight meals. Furthermore, their small, slider size makes portion control difficult—in the best way possible! Everyone loves a warm, gooey grilled cheese, and using Hawaiian rolls adds a delightful texture and subtle sweetness that regular bread just can’t match.
Ingredients
- 1 package (12 count) sweet Hawaiian rolls or sweet slider buns
- 8 ounces (about 1 cup) shredded sharp cheddar cheese (or a blend of cheddar and Monterey Jack)
- 4 tablespoons unsalted butter, softened
- 1 tablespoon mayonnaise (optional, for crispier crust)
- 1 teaspoon Dijon mustard (optional, mixed with butter)
Step-by-Step Instructions
- Preheat your oven to 350°F (175°C). Lightly grease a 9×13 inch baking dish or line it with parchment paper.
- Carefully slice the entire package of Hawaiian rolls horizontally in half, keeping the rolls connected in their original shape. Do not separate the individual rolls yet.
- In a small bowl, mix the softened butter with the optional mayonnaise and Dijon mustard until well combined. This mixture helps achieve a golden-brown crust.
- Spread the butter mixture evenly over the cut side of the bottom half of the rolls.
- Distribute the shredded cheese evenly over the buttered bottom halves of the rolls. Be generous, ensuring cheese covers the entire surface area.
- Place the top half of the rolls carefully over the cheese, reassembling the loaf shape.
- Lightly spread any remaining butter mixture over the top exterior surface of the assembled rolls.
- Cover the baking dish loosely with aluminum foil. Bake for 15 minutes.
- Remove the foil and bake for an additional 5 to 10 minutes, or until the tops are golden brown and the cheese is completely melted and gooey.
- Carefully remove the dish from the oven. Let it rest for 2–3 minutes before slicing between each roll to create individual mini grilled cheese sandwiches. Serve immediately.
Expert Tips / Pro Tips
- For extra flavor, brush the tops of the rolls with melted butter mixed with a pinch of garlic powder or poppy seeds before baking.
- Do not overbake once the foil is removed. The rolls can burn quickly due to the sugar content. Watch them closely during the final 5-10 minutes.
- Use cheese that melts well. A combination of Gruyère, Monterey Jack, and Cheddar provides the best stretch and flavor.
- If you prefer a stovetop method for a few sandwiches, slice the loaf apart first, assemble them, and grill them in a skillet over medium-low heat, flipping once, until golden brown on both sides.
Variations & Substitutions
- Proteins: Add a thin slice of ham (a classic!), turkey, or crispy bacon between the cheese layers before baking for a complete slider experience.
- Spice Factor: Mix a dash of cayenne pepper or a few slices of pickled jalapeños into the cheese mixture for a spicy kick.
- Different Cheeses: Gruyère, Provolone, Fontina, or Pepper Jack are excellent substitutes for traditional cheddar.
- Sweet & Savory Boost: Spread a very thin layer of fig jam or apple butter on the inside of the top roll before assembling for complex flavor layering.
Serving Suggestions
These mini grilled cheeses are spectacular when served alongside classic dipping options. For a full meal, pair them with a warm bowl of creamy tomato soup or a simple side salad with a bright vinaigrette. They are also fantastic served as appetizers with a side of cranberry sauce or spicy ranch dressing for dipping.
Storage, Freezing & Reheating
For storage, keep leftovers in an airtight container in the refrigerator for up to 3 days. To reheat, the best method is in a toaster oven or conventional oven at 325°F (160°C) for about 5–7 minutes until the cheese is melted again. Microwaving is not recommended as it tends to make the bread soggy.
While these are best enjoyed fresh, you can freeze them after baking. Cool completely, then place the separated sandwiches between layers of parchment paper in a freezer-safe bag. Freeze for up to 1 month. Thaw slightly before reheating in the oven as described above.
Nutrition Information
| Nutrient | Amount Per Serving (Approx. 1 Mini Sandwich) |
|---|---|
| Calories | 180 kcal |
| Fat | 10g |
| Saturated Fat | 6g |
| Carbohydrates | 18g |
| Protein | 7g |
Note: Nutritional values are estimates and will vary based on the specific brands of rolls and cheese used.
FAQ
Can I make these ahead of time?
Yes, you can assemble the sliders completely, cover them with plastic wrap, and refrigerate them for up to 4 hours before baking. You may need to add an extra 5 minutes to the initial covered baking time since they are starting cold.
What kind of cheese works best for Hawaiian Roll Mini Grilled Cheese?
Any good melting cheese works well. Sharp cheddar provides the best classic flavor contrast to the sweet roll, but a blend featuring Gruyère or Monterey Jack ensures excellent gooeyness.
Why shouldn’t I separate the rolls before baking?
Baking the rolls together keeps them moist and ensures the cheese melts evenly across the entire loaf surface. Separating them beforehand can lead to dry edges and uneven melting.
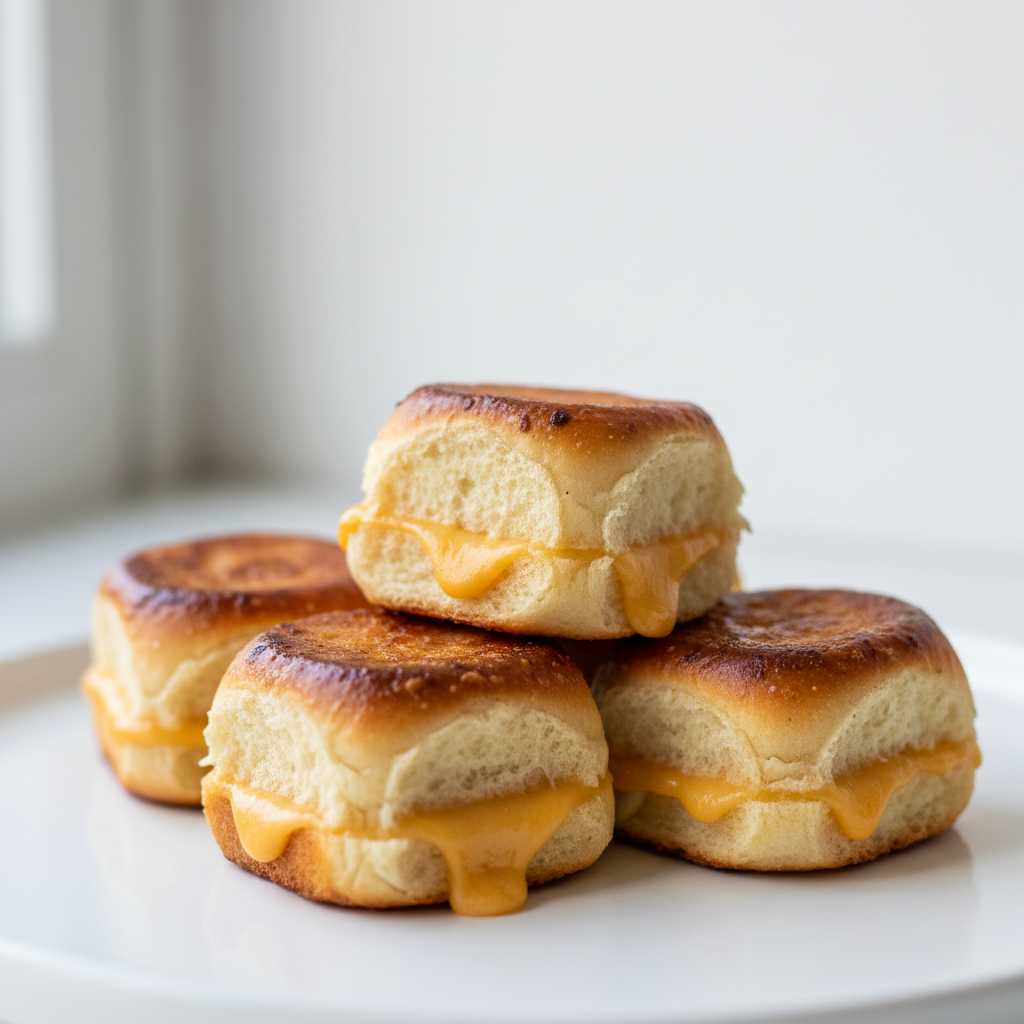
Hawaiian Roll Mini Grilled Cheese
Ingredients
Method
- Preheat your oven to 350°F (175°C). Lightly grease a 9×9 inch baking dish.
- Carefully slice the entire package of Hawaiian rolls horizontally in half, keeping the rolls attached to maintain their shape.
- On the bottom half of the rolls, layer the cheese slices evenly. Start with two slices of cheddar, then two slices of provolone, spreading them across all 12 rolls. Place the top half of the rolls back on.
- In a small bowl, melt the butter. Brush the tops of the assembled sandwiches generously with the melted butter, ensuring even coating.
- Cover the baking dish loosely with aluminum foil and bake for 10 minutes. This allows the cheese to start melting without browning the exterior.
- Remove the foil and continue baking for an additional 2-3 minutes, or until the tops are golden brown and the cheese is completely melted and gooey.
- Remove from the oven. Carefully slice between the rolls to separate the 12 mini grilled cheese sandwiches. Serve immediately.